Showing posts with label review. Show all posts

Thursday, December 30, 2010

Conair Tourmaline Ceramic Straightener Review (Guest Post)

The following post was written by Shipra, enjoy - Mani :)

Hello! I am a follower and fan of Makeup Newbie. I myself am a newbie with much less experience with beauty products (and much fewer lip glosses in my stash), but I enjoy reading and learning. A particular interest of mine is hair care.

My curls are not extremely tight but curlier than Mani’s soft waves, and a whole lot frizzier too. It’s frustrating when my curls aren’t in a cooperative mood, and so, for special occasions when I want to look a bit more polished, I always reach for my straightener.

Unfortunately, an awesome and very cheap Revlon straightener I owned for a couple years experienced electronic shock in London this last July and refused to turn on after the trip. Thus, after reading Mani’s post about straighteners in August, I hung around the hair supplies aisle in Wal-Mart to find a nice replacement. After purchasing the new straightener and trying it out for a couple months, I asked Mani if I could review it here on her blog.

PACKAGING:
 “Conair Tourmaline Ceramic Straightener”
(I don’t remember how much it was exactly, but it was definitely between $25 - $30.)

The Conair Professional tourmaline ceramic 1" straightener features 25% longer plates. Promotes healthy looking hair-micro particles of pure ceramic generate infrared energy to gently penetrate hair follicles while straightening. To give you faster styling, the 1" plates are 25" longer than our standard straighteners. Promotes shiny results the micro particles of tourmaline crystals emit natural ions that reduce frizz. Conair, 1" Tourmaline Ceramic Straightener, MODEL #CS58W.

The straightener offers heat levels up to 392F, auto-off, and dual voltage (a plus considering my London problem). Conair also promises professional results, reduced frizz, and smooth hair. Sounds promising, right?

THE EXPERIENCE:
While I’ve used this straightener a couple times before, most of those times were not as relaxed as a most recent attempt to get my hair straight just after finals ended a couple weeks ago.

Right out of the shower, after applying Garnier Fructis Sleek and Shine and lots of TRESemmé Heat Tamer Spray from Thermal Creations, I blow-dried my hair, not trying to make it straight, but letting it transform into a 70s fro. It took me about 10 minutes.

I then spritzed the entire poof with heat spray again and waited 10min for it to dry. After the hair was completely dry, I straightened section by section: below the ears, above the ears, around the forehead, crown, and bangs. It took me about 40 minutes to straighten my medium-length hair. Finally, I applied a tiny bit more Sleek and Shine to tame frizz, then pulled the hair back in a loose bun to consolidate the hair for about 15 minutes.

The end results were very satisfying! My hair fell nicely around my face, styled in the exact way that I had moved the straightener. Since I had paid particular attention to the roots, which I always used to mess up, the hair was smooth from the top to the ends, a very new effect for my hair!

Because I agree with Mani that the stick-straight-hair look isn’t enormously flattering, I worked in a small curve to the ends of my hair which made it more natural. My mom (I’m 20, so I’m still at home with the parental units) told me my hair looked much nicer this time than other times I straightened it (underhanded diss?) and that she even preferred it to my curly hair (which I got from her)!

PROS AND CONS OF THE STRAIGHTENER
Pros:
  • Because it’s only 1”, the straightener is very light and easy to maneuver. For hard-to-get pieces, like the hair on the back of my head, holding the straightener up doesn’t hurt.
  • Three heat settings—some straighteners don’t offer heat setting options while some offer precise, exact-degree settings. I find that exact degrees help when baking cookies, not when straightening hair. The three settings provide easy control over how much heat is applied to the hair without getting overly technical.
  •  As Mani always says, a little goes a long way, especially with my hair which isn’t very thin, but still straightens very easily. I can do the entire bottom layers on the Low setting and switch to Medium only for the crown.
  • My hair doesn’t feel burnt or damaged after use. However, the heat tamer spray probably also had a hand in that.
Cons:
  • Because the straightener has an auto-off mechanism, the straightener sometimes turns off while I’m still working with it. I’m okay with the safety of it though.
  • Since this is a cheaper straightener and I have curly hair, I find that I often have to go over the same piece a couple times, which is not necessarily the case when I use more high-end straighteners. That could, however, stem from the fact that I don’t use the High setting on the straightener.

I recommend this straightener to anyone with thin to medium-thickness hair, curls or waves, or just anyone on a tight budget. I’m definitely keeping this with my hair care supplies! What straightener do you use? 

Shipra, a Steel City native and pre-law student, is a makeup and hair care enthusiast. Don't let her self-proclaimed 'newbie' status fool you, this girl knows her way around a makeup pallet...must be the artist in her :) Thanks so much!

Friday, October 15, 2010

Revlon Just Bitten Lip Stain + Balm Review

Now, I know that Revlon launched their Just Bitten Lip Stain + Balm back at the beginning of the summer...but I only recently feel like I have used the product enough to be able to review it well. For those of you who haven't gotten a chance to check it out yet, read on. For all the rest of you who probably have tried it ages ago...well you keep reading too :P I put my own spin on this product for a fun look!


This really has been the summer of lip stains, what with Maybelline and CoverGirl also launching their own. I was really drawn to the Revlon one though. For one, I really like the spokesmodel, Jessica Biel, even though I know that is totally unrelated to the usefulness of the product, advertising works! But also, the 2 in 1 aspect really intrigued me. Having just gotten off of a lipstick purchasing high, I realized that in the summer reapplying lipstick is just a bore. Also, with the awful heat and humidity, I wanted something that was lightweight and not prone to melting in my makeup bag. Most of all, I wanted the just ate a cherry popsicle look! I am happy to say that with a few tweaks, I was able to achieve that look! I also think this shade will look just as lovely for the winter months as it was for the summer :)


I purchased the lip stain in Twilight, the color is pretty true to the packaging and comes on as a deep berry fuchsia on the lips (sorry I don't have any swatches, I couldn't get my camera to auto focus without flash). I am not really one for bright, bold colors, but this shade is really fun! I wouldn't personally wear it to a class or a casual event, but for a special occassion this stain would definitely be great! Since I was looking for a more toned down look, I decided to apply this product my own way...here's how:


First, I lined my completely naked lips with the marker tip, being careful not to draw outside my natural lip line. Then, I filled in my lips and made sure that the product was well coated on, it should feel a bit tacky when you press your lips together. Then, I waited for about a minute and then washed my lips off in the sink, just enough to tone down the brightness. The end result - the cherry popsicle stain I'd been vying for! Even after washing it off a bit, the stain is still there, just a bit lighter and less bold. I then applied the lip balm and was on my way. Though I'm sure this is not how most people would wear this product, I really enjoy this look. 


Pros:
- Marker tip makes application very easy!
- Product has a mild, fruity scent, but no real taste (good for lip product eaters like me!)
- When I washed off some of the stain, it lasted on my lips for a good 3-4 hours. Even through mealtimes!
- It is versatile, you can go for a bold or toned down look!
- Lip balm is nice and moisturizing, wish Revlon made it on it's own! 
- It can be removed with makeup remover, so you are not stuck with it til it fades away


Cons:
- Stain does not appear the same on all parts of lips...my bottom lip was more responsive to the stain than my top lip. It was as if the marker did not work as well on my top lips...kind of odd!
- Application requires a precision to make sure you don't draw out of the lines
- Stain may fade unevenly over the course of the day...


Overall, I really like this product!  Next time, however, I may just try to find a more natural shade to save me some steps and to allow for a longer lasting time! Any recommendations?

Wednesday, October 13, 2010

Boots Botanics Soothing Eye Make Up Remover Review

Have been using this product for the past month and I decided it was high time to let you all in on this gem :)


I'm a recent waterproof mascara convert...it's just so great (CoverGirl Lash Blast Volume)! I can wear it on humid, muggy, rainy days without a care...no flaking, no smudging!! I've even worn it in the shower...didn't move a bit! In the past, I shied away from waterproof formulas because I didn't want to deal with the nightly hassle of removing it. I turned to Boots Botanics Soothing Eye Make Up Remover when my trusted Neutrogena Oil-Free Eye Makeup Remover just didn't cut it (I kept losing lashes while trying to get the mascara off, ick!) and I am one satisfied consumer :)


The packaging is very cute, the bottle has an aluminum (at least I think that's what it is) cap and holds 5 fl. oz. The product needs to be shaken before use because the formula separates. It has a light, pleasant, soapy scent. I use a cotton wool pad, apply a bit and put it on my eye. It melts off eye shadow and liner instantly, waterproof mascara requires a few swipes. Excessive rubbing or tugging at lashes to remove mascara is not necessary at all! Your skin will thank you for this :) It leaves behind an oily residue, but that's nothing a quick rinse with warm water won't take care of! This product is meant for all skin types, so the oily residue shouldn't be an issue for oily-skinned ladies. I have gotten the product in my eye (c'mon, it's me we're talking about) and I'm happy to report that it is very gentle and does not sting! 


My only gripe with this product is how small the packaging is! I wear some form of eye makeup pretty much everyday, so I wish that the bottle were available in a larger size at Target. Til then, I'll just need to stock up!


Highly recommend this product, it made me a waterproof mascara convert! 

Thursday, September 30, 2010

MAC Select Moisturecover Concealer Review

I purchased the MAC Select Moisturecover Concealer about two months ago with the express purpose of covering up my undereye circles. While I am still a fan of the Maybelline Dream Mousse Concealer for covering up blemishes, I needed a light, easy-to-blend product to brighten up my face. I've been scheduling a lot more early morning consulting appointments these days, which has been giving me a chance to really try this concealer out! 


Here is what MAC Claims:
"A luxuriously blendable moisturizing concealer in a tube with built-in doe-foot applicator. Goes on exactly where you want it: blends in for a natural satin-smooth ultra-moisturized finish. Layers up for added coverage. Line-softening, skin-perfecting: The Pros’ “select” for under-eyes and delicate skin. Wide shade range provides soft, natural camouflage."


I really do agree with them! The doe foot applicator allows for easy application, though it may not be the most hygienic option. The makeup artist at MAC told me to make three dots of concealer, in a horizontal line under my eyes, and to then blend that in with my finger, no brush necessary! I blend from the inside corner of my eye to the outside end. The yellowish orange concealer blends in well to conceal any darkness and gives me a fresh, natural look. Since I am a minimalist, I asked if it was necessary to set this with a powder and she said that it can stand alone, how great is that? It leaves a slight dewy glow which I like and once dry, has been lasting me all day. Even throughout the humid weather that NYC has been experiencing lately, this product doesn't fade or budge! 


In addition to applying this concealer to my undereye area, I have also been applying it to blemishes. It does a great job neutralizing the redness without looking like I've caked makeup on my face! It is very easy to blend out with my finger and the shade really suits my skin tone.


Recently, I came across Peaches and Blush's blog post about MAC's foundation and concealer naming system and she really cleared up any confusions I had on the topic! NW means neutral warm and NC means neutral cool,  referring to warm or cool skin undertones. The shading system works according to the color wheel, so warm toned skin types would require NC foundations while cool toned skin types would require NW. When selecting concealer, it's important to see the undertone of the area being concealed. For the Select Moisturecover, I am an NW 35, which means that my undereye circles tend towards the cooler end of the spectrum and can be neutralized with a warm shade. All this color talk takes me back to 9th grade art class...love it!


At the end of the day, removal is very easy. I have had zero issues removing the concealer with Boots Botanics Soothing Eye Makeup Remover. Nice to know that it stays put when you need it to and comes off easily when you want it to!


I highly recommend this product for someone who is looking for some light concealing, especially in the undereye area. It makes my look a bit more polished and professional, which is exactly what I was looking for :) I do not, however, think this product would suit the needs who needs lots of coverage as it is very lightweight and sheer.


I am already starting to plan my next MAC purchase! I really want to find a fun gloss for the fall and winter. There are so many glosses to choose from: Creamsheen, Lustre, Dazzle...I've really been into berry shades these days...any recommendations?! 

Sunday, September 26, 2010

Mascaras! - A Combined Review

How can you not love the pink bristles?
Confession: I have very average eyelashes. They are not very long, not very voluminous, not very curly...in short, entirely forgettable! Now, I have two choices: a) do nothing or b) use one of the greatest inventions since the wheel, curling irons, $5 manicures, and hair claws...Mascara! 


Til date, I have tried 6 different types of drugstore mascaras (remember, I am new to the world of makeup). Here are my thoughts:


1) Maybelline Great Lash in Blackest Black - I bought this mascara because it was so highly reviewed in beauty and fashion magazines. Sadly, it didn't live up to the hype. This was my first mascara, so there is a chance of user error...but I wasn't too crazy about the formula. As much as I made sure to wiggle the synthetic bristle brush from roots to tip, I would get clumps galore and end up with scary spider lashes! 


2) CoverGirl LashExact in Very Black - I am on my 2nd tube of this and I just love it! The pink plastic-y bristles grab the product evenly to prevent clumping. This mascara really gives me a nice, jazzed up natural look, perfect for work or daytime. It separates my lashes really well and holds a curl, even though the formula isn't waterproof. It works even better when combined with #3 below.


3) Jane Fan Club Clear Curling Mascara in Crystal Clear - I am crazy about this product because it works really great as a mascara primer! When I apply this first, my other mascaras glide on smoothly and don't clump as much. Also, it makes removal really easy! It feels really nice on my lashes, sorta like a conditioner. This is a daily staple for me :)


4) CoverGirl Professional Super Thick Lash in Very Black - This was meant to be my nighttime, bold, sexy mascara and while it wasn't terrible, it required just a little too much work to remain in my collection. I think I am just not skilled with the synthetic bristle brush, because this, too, was a very clumpy mascara for me. Only after really wiping the brush down on the insides of the tube could I get the look I was going for. Too much effort for va va va voom lashes!


5) Maybelline Last Stiletto in Very Black - As I've told you before...I'm a sucker for packaging! A mascara tube in the shape of a stiletto heel, how cute is that? Well...that's where the 'good' ends with this product, for me anyways.  It has an overwhelmingly bad chemical smell that I cannot ignore. The brush is oddly shaped, it's retangular and awkward. The best I could manage were awkward stuck together lashes that stuck straight out. 


6) CoverGirl Lash Blast Volume Waterproof in Black - This is my very first waterproof mascara! When I first bought it, I was amazed and how well it could hold curl and how it didn't flake or budge at all all day. I've been using this for the past two months, so it may just be that the formula is getting old, but it has been a little stickier and more clump prone lately. It does give me the dramatic look I was going for though, so I will most likely repurchase!


There you have it! The next tube I buy will most likely be CoverGirl LashExact Waterproof. I've decided to steer clear of Maybelline for the time being, though I am open to any recommendations you all may have! What is your go-to mascara?

Wednesday, September 22, 2010

Vertical Nail Ridges and Review

A couple of months ago I started noticing vertical ridges on my fingernails. Thanks to Google, I didn't have to freak out for very long...I was reassured, after reading two or three sites, that this is a normal phenomena that occurs with age...but wait, I'm not that old! Since when are the mid-twenties what is implied when one says "with age"?? With a little more nosing around the net, I found out that vertical ridges can be caused by a variety of reasons, including: malnutrition, disease, and lack of moisture. 

I'm a single gal, full-time student and part-time consultant, so unfortunately, I am not the healthiest eater. I started taking some multivitamins, not as a substitute for my poor eating habits, but to supplement my newfound desire to eat healthier. Mom touting the virtues of fruits and veggies just doesn't have the same effect as the prospect of a flawed manicure! 

I received a clean bill of health at my most recent physical, so that leaves the lack of moisture issue. I had always browsed the cuticle oils and treatments in the drugstore nail polish aisle, but never really understood the hype. Enter internet wisdom: The job of our cuticles is to protect the area between the skin and nail from infection. If the cuticle is dry or cracked, it is unable to properly do its job! Damaged cuticles can lead to issues like vertical nail ridges and infection. While I am a nut about moisturizing my body, I oftentimes neglect my hands. I mean, sure, I keep a mini bottle of hand lotion in my bag for those days when I'm feeling super dry...but that's about it...and my cuticles are not something I really notice unless I'm getting them tended to at a salon. I decided to buy two cuticle care products and give them a go. I'm happy to say that I was pleasantly surprised with the results. Check out my reviews below!

Review:
Sally Hansen Vitamin E Nail and Cuticle Oil

Vitamin E is beneficial in repairing cracked cuticles and that was my main criteria for purchasing this product. The bottle comes with a convenient in-lid brush (nail polish style) that makes application very easy. I just brush the unscented oil onto my cuticles and gently massage it in afterwards. The great thing about this product is that it really gets sucked up by my skin and cuticles, not leaving me with an oily feeling for too long afterwards. This positive point may also be my only real issue with the oil, it doesn't last very long! There is immediate moisture-delivery to my cuticles, but it is not the long-lasting type of moisture. This isn't an issue when I am performing an at-home manicure and am using the oil to aid in grooming my cuticles, but when I want to deep moisturize my cuticles, I like to pair this oil with Burt's Bees cuticle cream.

Burt's Bees Lemon Butter Cuticle Cream

This is a very thick, emollient cream which really gives my cuticles the moisture they are lacking! The ingredients include sweet almond oil, lemon peel oil, cocoa seed butter, sunflower seed oil, and beeswax, of course. It has a very strong lemon scent, which I really love! Be sure to warm the product up with your fingers before massaging onto your cuticles, otherwise not a lot comes out...I literally created a mini-dent in the cream and then was able to dole the product out in the amount I wanted. Unlike the Sally Hansen Oil, this product really lingers. Best to use it at night! 

Will I repurchase? Yes!
The Sally Hansen oil + Burt's Bees cream combo has really made a difference in my fingernail/hand health ;) The ridges aren't completely gone, but now, after a couple months of TLC, they are limited to my thumbnails. Here's hoping my nightly moisturizing ritual and healthy eating will keep the ridges away for good!

Sunday, September 19, 2010

EOS Shave Cream Review

Back in July, I gave you all my first impressions of EOS shave cream (link to post). Since then, I bought a bottle of the Lavender Jasmine scented shave cream from my local drugstore and gave it a whirl. Here are my thoughts:


EOS Ultra Moisturizing Shave Cream - Lavender Jasmine


This is a thick and creamy shave cream. The lavender jasmine scent is subtle and pleasant. While this cream was moisturizing enough for my sensitive underarms, over time I found that it did not impart enough moisture to my legs. The consistency of the cream left me more prone to dryness, nicks, and cuts. I think this is because the thick cream did not spread evenly and when exposed to water it would easily wash away (it's easier to for underarms to dodge water than legs!). For those of you who shave in the shower...this might not be the product for you. 


I also was not a huge fan of the bottle design. Now don't get me wrong, the plastic bottle idea is great...no more rusty rings! However, halfway through the bottle, I had to really press the pump multiple times to get any product out. The 7 fl. oz. bottle barely lasted me a month. My 'old faithful' shaving cream, Barbasol with Soothing Aloe, is an 11 oz. bottle which normally lasts me up to 3 months. It is also much less expensive at $2-3/bottle at most drugstores. While Barbasol does not really feel moisturizing, it does provide the right amount of lubrication so that I don't cut myself.


Overall, I was disappointed that my great first impression did not hold true when I bought the full size bottle. If this were re-packaged in a squeeze bottle, it may be more worth the cost, but for now, I have decided to check out a new shaving cream: Trader Joe's Honey Mango Shave Cream with Aloe Vera and Vitamin E. Will post a review soon :)

Saturday, September 18, 2010

My HG Moisturizer


As you may recall, back in June I had yet to find my Holy Grail body moisturizer (link to post). I mean, sure...I'd found a some 'O.K.' or 'pretty good' products, but not the the product (yes, yes, I have a flair for drama...deal with it!). Last month, I stumbled upon Johnson and Johnson's Baby Creamy Oil and now I can proudly say that I have found my HG body moisturizer!! :) 


Johnson and Johnson's Baby Creamy Oil with Aloe Vera and Vitamin E Review

Johnson and Johnson Claims: 
This is a "creamy oil enriched with soothing Aloe and Vitamin E, [which] combines rich emollients with Johnson's Baby Oil to provide long-lasting moisturization. Our indulgent, non-greasy creamy oil absorbs quickly and leaves nothing but softness behind on the skin. Its sweet yet subtle fragrance will delight your senses...To Use: Smooth over entire body for baby soft skin."

My experience:
Creamy baby oil is the perfect way to describe this moisturizer. It isn't as thick as a lotion, but it isn't as slippery as oil. It's a very light formulation that easily blends into your skin and leaves behind long lasting moisture. I have been using this product every day for almost two months now and I can definitely report a change in the texture and softness of my skin! This moisturizer is non-irritating, even when I apply it to my legs after shaving. I used to be a compulsive scratcher...my legs would feel itchy and dry by the end of the day. Now that is no longer an issue...the smooth and soft feeling continues until the next day when I get in the shower :) Another added bonus in my book is the shimmer incorporated into the product. I love shimmery arms and legs, especially in the summer months! 

-PROS-
  • Non-irritating
  • Non-greasy or sticky
  • Absorbs into skin quickly
  • Inexpensive, available at most drugstores, Target, Walmart, etc.
  • Nice light scent
  • Imparts moisture that lasts all day long, no need to reapply
  • Hint of shimmer
-CONS-
  • Need to use a lot of product to achieve soft and smooth feeling. I use about two squirts for my lower leg, two to three for my thighs...etc. 
  • Not very much product in the bottle (8 fl. oz.), I have been averaging a bottle a month.
Will I repurchase? YES! I already have bought 3 bottles (am on my second, wanted to make sure I had a back-up ready to go). Although it finishes up very quickly, this product is 100% worth it. Not only is Johnson and Johnson's a brand I trust, it is also very inexpensive and readily available. Here's hoping that this product becomes part of their permanent line! 

For all of you out there with dry, sensitive skin, give this product a try. It might just be your HG moisturizer!

Girl's Night In!

Life has been busy! Last year of graduate school + consulting projects = limited free time...see, this blog is my guilty pleasure and til tonight, I wasn't really in the zone, if you will. Well, now I am rockin' my pjs, I've got my party music going, and I'm spending a little time in :)


Face skin care routine
Once a week, at night time, I like to bring out my face care trio :) By the way, I have combination skin, dry cheeks, oily T-zone. Now, read on:


Part 1: Noxzema: The Original Deep Cleansing Cream
I have been using the original Noxzema facial cleanser since as long as I can remember. This is one of those products my Mom introduced to me during childhood. I really love the scent...I find the blend of camphor, menthol, eucalyptus to be really invigorating! I do have friends, however, who do not share my love for the Noxzema smell, therefore I recommend giving it a trial sniff before purchasing. Never a good thing to be stuck with stinky soap!  Noxzema leaves my skin feeling clean and soft, but never tight and dry. This would definitely be suitable for everyday use...during some of the humid weeks this past summer I did use it every day, because my skin was really oily, and I didn't notice any negative changes in my skin. 


Part 2: Aveeno Active Naturals Skin Brightening Daily Scrub
Once I rinse off all of the Noxzema, I go in with Aveeno Skin Brightening Daily Scrub. I like to massage it small circular motions around my face, being careful to steer clear of the area around my eyes and enjoy the feeling of the microbeads. The microbeads are not abrasive at all, but, believe me, they get the job done. My face feels so soft afterwards, its amazing! The scrub has a nice, fresh, soapy scent and a little goes a long way! 


Part 3: Freeman Facial Clay Mask Avocado and Oatmeal (reserved for my solo nights in!)
This is exactly what I think of when I think of face masks...thick, gloopy, and mint green in color. It just brings me back to those 90s sitcoms where the terrified brother walks in on his sister with her hair pulled up in a towel, cucumber slices over her eyes, and the mint green mask on her face. Classic :) This mask is just that! One quarter sized squirt is all that is necessary to cover my entire face. I like to evenly smooth it on and then grab a good book or my laptop and wait til it dries. It does have a hint of avocado scent which is quite pleasant. The product claims to purge pores and firm/smooth skin. Not sure of the others, but my skin does feel very smooth afterwards! 


So, dear readers, now you know what I do when I get a free night to myself. I throw my hair up into a bun, put on my skiing monkey pajamas (you better believe it!), and enjoy a little girly pampering :) What are you girl's nights in like?

Monday, August 16, 2010

Anti-Frizz Hair Products and Giovanni Frizz Be Gone Review

My main hair concern has got to be frizz. I have been blessed/cursed with big hair. Thick wavy locks that have a tendency to fro, frizz, and look dull and dry unless I apply some taming product and blow dry with a diffuser. I have tried multiple different products over the years (since about the 10th grade when I got 'schooled' on hair maintenance by my hair guru bff). 


Here's a general list:


  • John Frieda Frizz Ease Hair Serum Extra Strength Formula - I still have a bottle of this on my vanity...can never seem to finish this product off. It's what I use when I run out of other products. Cannot really say I see a difference after applying this serum, hair doesn't appear less frizzy or dry looking. Also, I have to be very careful to apply a tiny bit, otherwise my hair just looks oily. Not worth the price for this high end drugstore product!
  • John Frieda Brilliant Brunette Shine Shock Leave-on Perfecting Glosser - Now, this product is intended more to give hair a glossy shine, but it's thick oily texture also helped tame frizz somewhat, if you go tthe amount right...too much and you end up with greasy looking locks :( Again, not worth the price to me, does not fully deliver!
  • Sunsilk Anti-Poof 24/7 Creme - Let's just say that with a name like that, I had high hopes! Unfortunately, instead of taming frizz while maintaining body, the cream simply weighed my hair down. 
  • Dove Smooth and Soft Anti-Frizz Cream - Same story as with the Sunsilk creme, left my hair flat and coarse feeling...no smoothness or softness!
  • Garnier Fructis Sleek and Shine Leave-In Weightless Anti-Frizz Serum - This product had been my HG for the past couple of years! I applied a teeny tiny amount to towel dried hair and not only did it smell divine, it also helped to tame the frizzies! Why, oh why, did it have to be discontinued? Garnier Fructis now has a Sleek and Shine Cream version, but I can't say I feel the same way about it. 
  • Giovanni Frizz Be Gone Hair Serum - I recently discovered this product through TotalBeauty.com. It was highly rated as a top hair product under $10. Cheap, anti-frizz product in serum? How could I say no?? I've been using it for a month and am completely sold! I use a small amount (think diameter of pencil eraser) on the ends of my towel dried hair, concentrated on the ends. Since it is a serum and oily, I will apply any of the left over product on my hands to my bangs and the hair framing my face. I blow dry with a diffuser and then will apply the same amount after my hair is almost completely dry (don't usually have the patience to dry it the whole way!) to the ends and let them air dry. The result is a significant reduction in frizz while maintaining body and adding loads of pretty shine! It has a nice floral scent to boot. So glad to have found this Garnier Fructis Serum replacement...I honestly think it's an upgrade :) Also, since only a tiny amount is necessary for each use, the product will last a long time...how's that for great value?

Thursday, July 29, 2010

My Razor Burn and Ingrown Hair Solution

As I have mentioned before, one of my main beauty concerns is preventing razor burn and ingrown hairs. As a single gal livin' on a budget, I cannot afford the luxury of frequent visits to the salon for waxing and am too skeptical to invest in a epilator. I've stuck to my good ole Gillette Venus razor for the greater part of the past decade, and, pending any major issues in the future, will probably continue to do so until the next "big thing" in women's razors. During the summer months, I shave about once in every two to three days, and this can really take a toll on my already dry skin! I am also prone to the dreaded ingrowns on my legs and underarms. Thanks to the wonderful feedback from the ladies posting on the MakeupAlley boards, I was directed to TendSkin. While shopping for TendSkin, I was also advised by an employee at Sephora to get the Korres Yoghurt Cooling Gel to apply after TendSkin. Here are my thoughts on both:


Tend Skin Review:
I bought the Tend Skin Refillable Roll on from Sephora, It cost $17 for 2.5 oz. 
Positives -- I have been using this product for a little over a month and already have seen some great results! This is a pretty fast working product. I initially bought it because of painful red bumps in my bikini area. I used as advised, twice a day, and within a couple of days, the entire area was free and clear! I have also been using this on my legs, especially right after shaving, and though that is the time when it stings the most, it is also the time when TendSkin is the most effective! It helps to prevent future ingrowns because it works as an exfoliant! The area where this product has made the biggest impact, however, is my underarms. I have very sensitive underarms with ingrowns that aren't too pretty :( This product has been really making an impact! My underarms have much fewer red bumps, if any, and TendSkin has the added bonus of acting as a deodorant! How cool is that? This is most likely because of the alcohol content which helps with deterring bacteria formation. The roll-on applicator is really handy and allows for quick application without any waste.
Negatives -- I have been using these 2.5 oz since June and now I have about a pinky's width of product left. Though it is expensive, $17 every two months is not unreasonable. TendSkin is all about tough love...yes, it helps you get over those unsightly red bumps, but you gotta be able to handle a little stinging first. It is an alcohol-based product, so yes, it's gonna sting. Especially on freshly shaved skin! For this same reason, it also doesn't smell so great...but, in my opinion, small prices to pay for bump-free skin!!
Will I repurchase? -- Of course! Although this time, I going to go for the 16 oz. bottle and do some price shopping online.


Korres Yoghurt Cooling Gel Review:
I also bought this from Sephora. It cost $23.50 for 5.07 oz. 
Positives -- According to the packaging, it is originally intended to provide relief for sunburn, but the Sephora employee advised me to use this gel on areas that I used TendSkin on to provide some cooling relief after the stinging pain! I was intrigued by this gel having yogurt as it's main ingredient. Growing up, my Mom told me about the cooling properties of dahi (yogurt) and its use in at home facials. I used a pump or two of the gel about 5 minutes after using TendSkin and it really helped to relieve the stinging! I also started using this at night to relieve the dry skin on my legs from lots of shaving and on my underarms...it really helped in both areas! Yogurt Power to the Rescue :P 
Negatives -- Okay, this is also another expensive product...but I do think it might be worth it! The major downside of this gel, in my opinion, is the very short expiration date! I bought this product in late June and it expires in September!! I have been using it pretty regularly, but I don't think I'll finish it by September. Too bad it doesn't come in a smaller size! Another minor issue is that it can leave a slightly sticky sensation. I feel this way if I apply too much without moisturizing beforehand.  
Will I repurchase? -- Honestly, still on the fence about this one, but am leaning toward yes! It really provides me with skin irritation relief without being too greasy like a lotion can be. 

Saturday, July 24, 2010

Nail Polish Rave!

While out and about this summer, I've noticed women everywhere sporting bright, bold pedicures and that got me wanting to step away from my usual pinks and reds and try something a little more wild! 


Enter Petites Color Fever Nail Polish in Figi. This is a beautiful shimmery teal blue that made my sandal-clad feet feel even more summery :) 


I picked the polish up at my local Rite Aid on a BOGO half off deal, but it wasn't too pricey to begin with (typically around $3). While I really do love Essie and OPI, Petites is not bad at all for a bargain polish. I applied two coats and it was so shiny that I didn't bother with a top coat. It  lasted for about 3 weeks without the shine fading...I removed it not because it started to chip ever-so-slightly slightly, but because I needed to tone it down for a work event!
Cute, huh?
I also got the Petites Color Nail Polish in Peach Blush, will post pics soon :)

Tuesday, July 20, 2010

Maybelline Dream Mousse Concealer Review

Finally...after reading review after review and perusing several face product aisles, I have found my concealer! No longer will I have to meet a client looking like I should be back in bed or spend hours before a special event agonizing over a blemish. No Siree, the new, "concealed" Mani is here folks!


Prior to buying the Maybelline Dream Mousse Concealer, I had read some mixed reviews and didn't really know what to expect. My main concern was color matching. In the past, I have purchased some tinted moisturizers from drugstores did not suit my yellow-undertones. I have been using the Dream Mousse Concealer for the past month and a half and I am really happy to report that, not only does this concealer work with the undertone of my skin, but the Beige shade (Medium 0-2.5) matches me so well that I can wear it on its own! How great is that? I haven't fully warmed up to the idea of wearing foundation daily, but I am 100% on board with using this concealer to hide my imperfections!


While I have been using Dream Mousse Concealer for the last month, the past couple of weeks have provided me with the perfect storm of conditions to really test the ins and outs of this product: 
- Massive heat wave with high humidity levels (ick!)
- Five new blemishes that randomly showed up, all at the same time, in the same area :-( 
- Multiple work engagements that required face-to-face meetings (I tend work from home mostly)
- Lots of semi-formal events with friends
In short, the weather was awful, my face was extremely angry at me, and I had to look nice more than usual. I turned to Maybelline's Dream Mousse and it did, indeed, come to the rescue! 


I have been using a Q-tip to dot the concealer onto my face, partially for hygienic reasons and also because I have yet to invest in a concealer brush. Once it's on, I blend it in with my finger, this is also how Maybelline recommends the product be used for best results. During application and while blending, the concealer feels creamy, smooth, and airy. It doesn't feel greasy or slippery at all and after blending, the product dries to a powder finish on my face. I did not feel the need to use anything to set the concealer after application. This weekend, I wore this product for a minimum of eight hours per day and I did not experience any melting or fading at all. Quite to the contrary, my face remained perfectly concealed and the product did not budge until I washed my face before bed. Each morning, I noticed that my blemishes were healing and that no new irritations had formed. I used to have this idea that makeup increased the likelihood of breakouts, but this product seems to be clearing my skin up! I also like that the concealer is scent-free.


As of now, the only downside I have to report is that the packaging is unsanitary. Like I said earlier, however, I have gotten over that hump by using a fresh Q-tip each time I use the product. I am extremely thrilled that I have found a concealer to help me look more fresh-faced and professional! It truly is a "dream" come true :P

Sunday, July 11, 2010

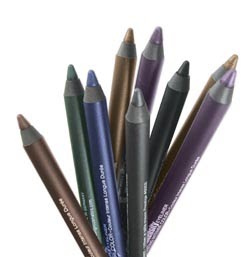
Eyeliners: My Faves

Before I started wearing lipsticks or mascara, I was wearing kajal or eye kohl. I discovered it in while poking around in my mother's bangle drawer and begged her to let me wear it to school. Soon enough, I was an expert at applying kajal to my waterline and was convinced that kajal plus lip gloss was all the makeup I ever needed. How naive was I??? 

Lately, I have moved away from the standard kajal look in favor of eyeliners and have been experimenting with different colors! 

- Jillian Dempsey for Avon: Professional Kohl Eye Liner in Black: This is a great soft, black pencil that comes with a built-in smudger on the end. When new, the pencil was amazing for making thin or thick lines and the smudger helped to soften the look for a more natural feel. Unfortunately, when I tried sharpening the pencil, the tip kept breaking and now it's much shorter and still blunt :( Recently read that putting the pencil in the fridge before sharpening will help, will try that!

- Prestige Soft Blend Kohl Eyeliner in Lagoon: This is a beautiful dark turquoise that adds a fun pop of color to my otherwise nude/natural look. The pencil is very smooth and has a nice built-in smudger as well. I like to apply this to my lower lash line with a little mascara.

- Prestige Total Intensity Eyeliner in Dark Brown and Powerful Purple (see pic): These pencil liners have such a  smooth creamy consistency, its just wonderful! I used to think I was terrible at lining my eyes, but now I realize, I used to buy bad eye pencils. This pencil does not tug at all! I like to use Dark Brown for daily wear and Powerful Purple on those occasions when I want to accentuate my brown eyes.

- Jordana QuickLiner Eyes in Black: This is a twist-up style liner which I bought at the Dollar Store. God Bless America, a country where you are never too far from a Dollar Store! This eyeliner is simply wonderful, glides on smooth and was $1. Will definitely be trying more colors in this line!

- Revlon ColorStay Liquid Liner in Blackest Black: Finally, a liquid liner that doesn't require an artist's touch to apply! The felt tip applicator is amazing and the formula is fast drying. Now, all I need to do is perfect the cat-eye and I'll be good to go!

I've heard that turquoises and purples go well with brown eyes and darker skin tones, what other colors/brands would you recommend? Let me know!


My "Curly Girl" Experience


Earlier this year I was introduced to the Curly Girl Method for Curly Hair and I decided to give it a try, here are my thoughts.

Quick Background Info:
My hair has a interesting history. All throughout childhood, up until my pre-teen years, I had stick straight hair. In middle school it was very frizzy and fro-y, bad memories :( Around 10th grade, I discovered that it was curly, so I'd just apply a bit of gel or mousse after washing and scrunch. About two years ago, my hair changed yet again, to wavy. Not quite sure why I've gone through so many transformations during the past 25 years...hopefully it won't change too much in the future!!

My take on the Curly Girl Method:
- No 'poo: I went shampoo free only once...and I kinda messed that up :P I made a brown sugar scrub, but I used a silicone conditioner by accident. Using brown sugar was interesting, but I felt like I needed to use a lot to properly cover my scalp as my hair was getting in the way. Afterwards, my roots felt very oily and weird...this may be because I didn't use a silicone-free conditioner. 
- Sulphate-free shampoo: I went in search of a sulphate-free shampoo and came back home with a big bottle Tresemme Naturals Moisture Shampoo which boasts lower sulphates and was on sale! I used this exclusively for about 3 weeks and I wasn't pleased with the results. I normally wash my hair every two or three days, but with this shampoo, I felt oiliness early on the day after washing and started washing more frequently. The Curly Girl Method recommends waiting for up to 6 weeks for your hair to adjust, but I was fed-up with over washing my already dry hair and not looking my best! I am still using it in conjunction with sulphate shampoos to finish it off, ugh!
- Silicone-free conditioner: I bought the Tresemme Naturals Moisture Conditioner and really love it! I have dry ends and this product has really been helping with that! I will definitely repurchase this conditioner :)
- Plopping: Besides as a way to amuse my family members, I really see no other benefit to plopping, for my hair at least. Added to my frizz factor and didn't define my waves!

Now, as I said before, I no longer have curly hair...its more wavy, so take my opinions with a grain of salt. I do, however, have family members with super curly hair who tried this method with me, and though they may have had more success with some aspects, stopped following it after a month or so. I will stick to using silicone-free conditioner and I am open to trying new sulphate-free shampoos if they are reviewed well. Being a true "Curly Girl" is a very time consuming process and I don't recommend it for the busy career woman/student.